Cloth nappies on a budget : Using prefolds and muslins
Nappies will be one of the biggest expenses for the first few years of your child’s life. Whether you use disposables (which could end up costing you thousands if you have more than one child) or reusables, it’s possible to spend an absolute fortune on what is essentially a poo catcher!
It’s no secret that using reusable nappies, especially if you reuse the same ones for more than one child, can save you an amazing amount of money.
Thankfully, there are very economical ways to get started with cloth, and today I want to talk about prefolds and muslins - two types of flat cloth nappy that are super affordable, effective, and actually quite easy to use.
Before we dive in, if you want to get started with reusables but have no idea where to start, don’t forget that you can get in touch with me.
I also have a whole YouTube video on prefolds, so if you’d rather take a look at that, you can find it below.
What are prefolds and muslins?
Prefolds and muslins are two different types of flat cloth nappy. They are generally made of cotton, hemp or bamboo, or a mixture. Muslins are exactly like the muslins you use as burp cloths, glorified handkerchiefs, and pretty much anything else in the first few months of a baby’s life. Just add cloth nappy to that list!
Prefolds, on the other hand, are like a muslin that has been pre-folded (get it?) and sewn into a smaller rectangle. It’s usually pre-folded so that it has three sections divided by lines of stitching, with the middle section being double the thickness of the outer two. Prefolds tend to come in two sizes - size 1 is great for tiny newborns, and size 2 up to potty training. It is possible to use size 2 from birth, they’ll just be a little bulky.
Prefolds are marginally easier to use because some of the folding has been done for you, saving you work before change time. The downside is they’re marginally more expensive and take a little longer to dry (because you can’t completely unfold them) - but we’re talking really marginal!
As with any natural fibres, they’ll need a few washes to reach full absorbency before you start using them. They also both need a waterproof wrap over the top - see my favourites below! Some folds are wrapped around the baby and fastened with a “nappy nippa” (or safety pins if you’re traditional!) while others are just laid inside the wrap.
What about terry squares?
While I’m on the subject, it’s worth saying that there is another kind of flat nappy out there, which is also affordable, quick drying and natural - the terry square. Terries tend to be what comes to mind when you mention reusable nappies - a folded towelling square with safety pins. I could write a whole other blog post on terries (and probably will!) so won’t go into much detail here, but it’s worth knowing that terries do also exist.
In particular, if you find you like muslins but baby starts out-wetting them, which does tend to happen as they get older, then switching to terries could be a really good option.
Prefolds make great stash boosters
Why consider using muslins or prefolds?
They’re durable. Prefolds and muslins have no breakable or delicate parts, being just a square of fabric. This means they can be washed hot without damaging them, which is great for getting rid of infections or for babies with very sensitive skin.
They’re economical. Prefolds and muslins (along with terries) are likely to be the cheapest option for using cloth with your baby.
They’re flexible. They can be folded in so many ways that you can tailor the fit to different babies at different ages. This means they can easily be used for multiple children and right the way from birth to potty (though how you use them might change).
They’re very quick to dry. Most modern cloth nappies can’t be folded out flat so the multiple layers of absorbency can take time to dry. Flat cloth, on the other hand, can dry super quickly.
They’re excellent for newborns. Newborns need frequent changes, which can lead to a lot of washing, but with a system of prefolds/muslins and wraps, you can reuse the wrap if it’s not dirty, thus saving on washing. Plus, given how cheap they are, they’re a fab way to have a great-fitting newborn stash without investing in specific newborn sized nappies. And as a bonus, you’ll be able to reuse them as inserts for pocket nappies or boosters for night nappies as baby grows up. Finally, they’re one of the most bombproof of reusable nappies, because the fact that there are two layers (nappy and wrap) means you have two lines of defence against newborn poonamis!
Remember that you don’t have to have all one type of nappy in your stash. You wouldn’t only ever dress your baby in one style of clothing - sometimes a onesie is best, sometimes leggings, sometimes dungarees… you get the picture. It’s the same with nappies. Prefolds make great stash boosters - they can step in when your slower drying nappies are still damp, or if you don’t have the funds to invest in a full stash of fancy modern nappies.
What are they not great for?
Any folded flat nappy requires a bit of practice to get right, so may not be used well in childcare settings unless your childcare provider is happy to invest time in getting it right (if so.. That’s amazing!) They could also be difficult to use in awkward spaces, anywhere where you need to change quickly, or once your little one gets to an age where they want to commando crawl off the changing mat at the earliest opportunity.
That doesn’t mean that they can’t be used in these situations, just be prepared for them not to be the easiest option! If you’re set on flat nappies, consider using an easier fold like the pad fold in these cases, or maybe have a few modern style nappies in your stash for when you need something very easy to use.
It’s also worth bearing in mind that muslins tend not to be absorbent enough for older babies, so while they make a great option for the first 6 months or so, they will eventually need boosting with an absorbent booster, or doubling up.
How do I use them?
First, you’ll need to decide how to fold your prefold or muslin. Once you’ve tried a few different folds, you’ll probably work out your favourite and then you can store your prefolds and muslins with some of the folding already done, so change time is a little quicker. I’ve included instructions for 6 different folds (3 for muslins, 3 for prefolds) below. Bear in mind that you can essentially turn a muslin into a prefold by folding it down into a smaller rectangle/square, so really these folds work for both!
Once you’ve done your best origami, you’ll need to put a wrap over the top. My favourite wraps are:
Thirsties Duo Wrap - These are sized, but most people get away with just the size 1 and size 2 if using with prefolds or muslins. There’s also a version with velcro closures.
Motherease Airflow Wrap - An excellent wrap that is super breathable so great for sensitive bottoms. Note that you can’t use this style of wrap with a pad-folded prefold, because you need the muslin or prefold to be fitted around baby for containment.
Anavy Pull Up Wrap - Super easy to use, especially for older babies and toddlers who are prone to wriggling! Can’t be used with a pad fold.
Seedling Comodo Wrap - A very reliable wrap that will work with all sorts of folds and provide excellent containment. There’s also a newborn version.
The folds
Pad Fold (prefold)
This is the easiest fold of all and there’s even no need for a nappy nippa. However, it doesn’t provide any containment so your wrap is more likely to get dirty and need changing. This fold can’t be used with an Airflow style wrap as the prefold doesn’t provide containment
Fold one third of the prefold in one each side.
Place the pad inside a wrap and fasten the wrap onto baby.
Another option is to fold your prefold in thirds widthwise (across the seams). This will give you a shorter but wider pad for a smaller baby, and also puts extra absorbency into the middle of the pad which works well for baby girls.
Angel Fold (prefold)
This is the simplest of the folds that require a fastener. It provides some containment, so can be used with an Airflow wrap, and can be adapted to fit the size and shape of your baby. However, it takes a little more work than a pad fold, and you’ll also need to master the nappy nippa (though it’s pretty easy!)
Fold one third of the prefold in one each side.
Open out the folds at the top end of the pad to form ‘wings’. Place the winged end under baby’s bottom.
Fold up a short section from the bottom edge.
Bring the folded end up between baby’s legs.
Bring in the two wings around baby’s waist and fasten with a nappy nippa.
Put on a wrap over the top.
Jelly Roll Fold (prefold)
This fold is a little more fiddly than the angel fold, but provides excellent containment.
Fold up the bottom end of the prefold. How much you fold will depend on the size of the baby - more for a smaller baby and less for a larger baby.
Place the unfolded end under baby’s bottom.
Roll each of the long edges in until you hit the lines of stitching.
Bring the folded end up between baby’s legs.
Bring in the two wings around baby’s waist and fasten with a nappy nippa.
Put on a wrap over the top.
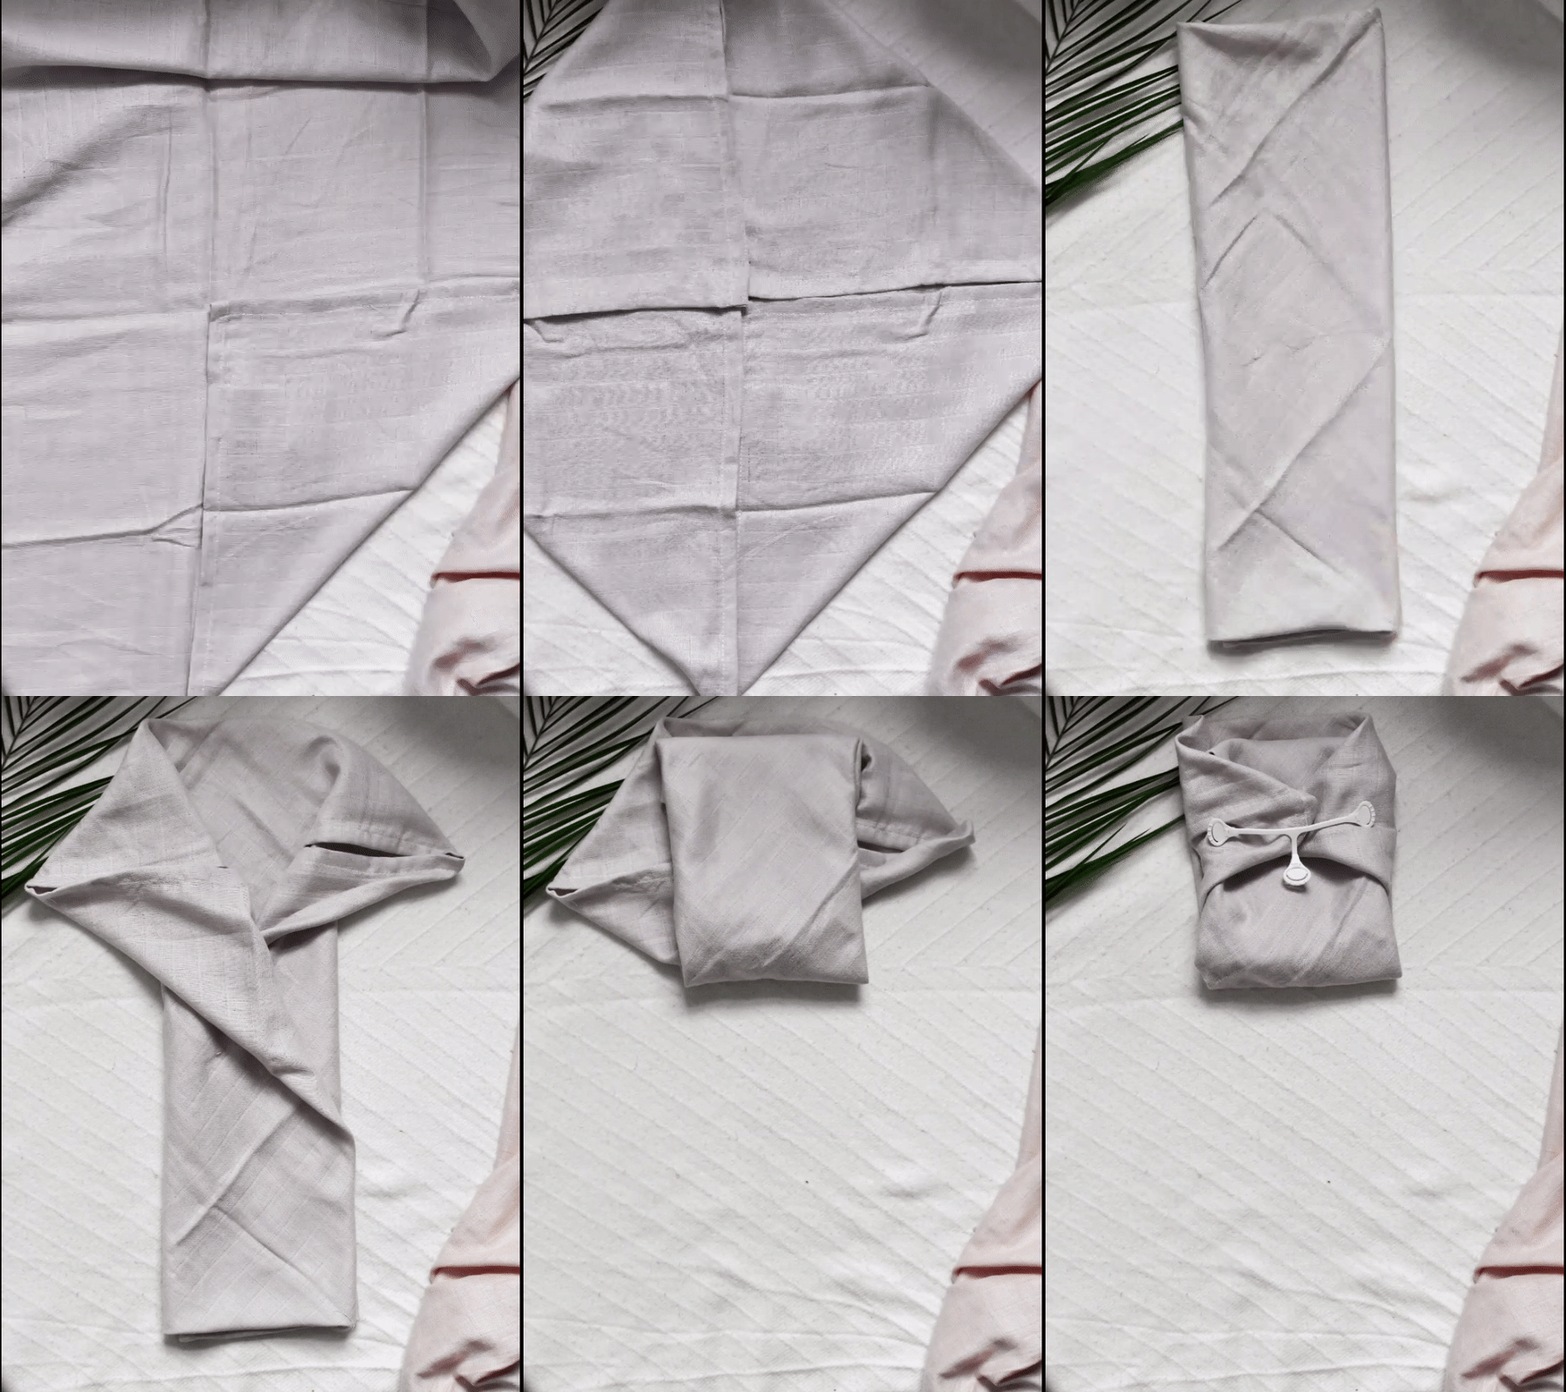
Jo Fold (muslin)
This is one of the simplest muslin folds to fold and will fit a wide variety of babies. It can be prefolded up to step 2 below and stored to cut down on work at change time.
Fold the four corners of the muslin to the middle.
Fold one side in a third of the way, then overlap the other side to form a long rectangle. You can store your muslins folded in these rectangles for ease.
For a smaller baby, you may wish to fold up one of the shorter ends of the rectangle.
Open the lengthwise folds at the other end of the rectangle to form two ‘wings’. Place the winged end under baby’s bottom.
Bring the other end up between baby’s legs.
Bring in the two wings around baby’s waist and fasten with a nappy nippa.
Put on a wrap over the top.
Newborn Fold (muslin)
This fold is ideal for use on newborns, and especially boys as the padding is at the front. It provides excellent containment thanks to the way the fabric is tucked in around the top of the legs.
Fold one corner of the muslin to the opposite corner
Fold this triangle in half into a smaller triangle. Turn so that long edge is away from you.
Place the long edge under baby’s bottom.
Bring up the bottom point of the triangle between baby’s legs.
Fold in the side points as much or as little as required for a good fit.
Bring the folded side points around baby’s waist and fasten with a nappy nippa.
Tuck in excess fabric at baby’s knicker line.
Put on a wrap over the top.
Corners Fold (muslin)
This fold is ideal for use on newborns and is slightly less fiddly than the newborn fold (above). It provides good containment, though not quite as good as the newborn fold.
Fold the muslin in half to form a rectangle and then in half again to form a smaller square.
Fold the corner that has all the loose corners of the muslin across to the opposite corner. Turn so that the long edge is away from you.
Place the long edge of the triangle under baby’s bottom.
Bring up two layers of the triangle point between baby’s legs, leaving the other two laying flat.
Bring in the two side points of the triangle around baby’s waist.
Bring up the final two layers between baby’s legs over the top of the side points, and fasten with a nappy nippa.
Put on a wrap over the top.
I have an ongoing relationship with The Nappy Gurus. This page contains affiliate links, which earn me a little bit of commission if you make a purchase, at no additional cost to you. Thank you!
If you found this post helpful, please consider buying me a coffee!


