Upcycled Christmas Ornaments (3 Beautiful Ways to Reuse What You Already Have)
Discover easy upcycled Christmas ornaments you can make from recycled materials. These DIY ideas are beautiful, budget-friendly, and perfectly festive!
This page contains affiliate links, which earn me a little bit of commission if you make a purchase, at no additional cost to you. Thank you!
Have you ever opened your box of Christmas ornaments — the one you packed away so carefully last year — only to find yourself thinking, I just don’t love these anymore?
That was me last week.
Some time since my 2016 glitter obsession, my taste seems to have taken a little wander and suddenly all those gaudy baubles felt more “tinsel explosion” than timeless charm.
But rather than tossing them away (I could never!), I decided to give them a gentle refresh. A little paint here, a little ribbon there. Quick, easy, and made entirely from recycled materials I already had tucked in a drawer.
The result is a handful of baubles that feel perfectly me again.
In this post, I’ll show you exactly how to do the same: three simple upcycling ideas to turn your tired old ornaments into little festive treasures.
Whether you’re trying to tame the chaos of the ornament box, cut down on waste, or just fancy a fresh look for your Christmas tree this year – this simple tutorial is for you.

Stop Buying New Christmas Ornaments!
It’s so easy to get swept up in the shimmer of it all. The glossy shop windows, the new colour trends, the promise that this year’s Christmas will somehow feel more magical if everything just matches.
But the truth is, that magic doesn’t come from a shopping bag.
Every bauble, garland, and glitter-covered ornament in those aisles comes with a hidden cost, not just to our wallets, but to the planet. Most are made from plastic, produced in factories halfway across the world, wrapped in even more plastic, and shipped thousands of miles before they reach our shelves.
All for something we might use for a few weeks a year, then replace when our taste changes or the glitter starts to dull.

When you stop buying new ornaments every December, you quietly step out of that cycle.
You use what’s already in your hands — a box of old baubles, a length of ribbon, a handful of fabric scraps — and turn them into something that feels fresh again. You create beauty without adding to the pile of things the earth has to carry.
A patchwork star cut from last year’s tablecloth.
A big gingham bow made from the offcuts of a favourite dress.
Rather than filling your basket with more sparkle, try a slower kind of joy – reuse, repaint, and reimagine. I promise handmade ornaments will make the holiday season even more joyful!
If you do really want to buy something, the thrift store and Facebook Marketplace are great places to look for Christmas home decor for upcycling.
Using old things that have already lived a life is not only a better option for the planet but so much more meaningful. It also saves some extra cost at a time of year when finances can be tight!
If you’d like another lovely holiday craft project, try my potato stamp wrapping paper tutorial — it’s quick, joyful, and wonderfully thrifty.

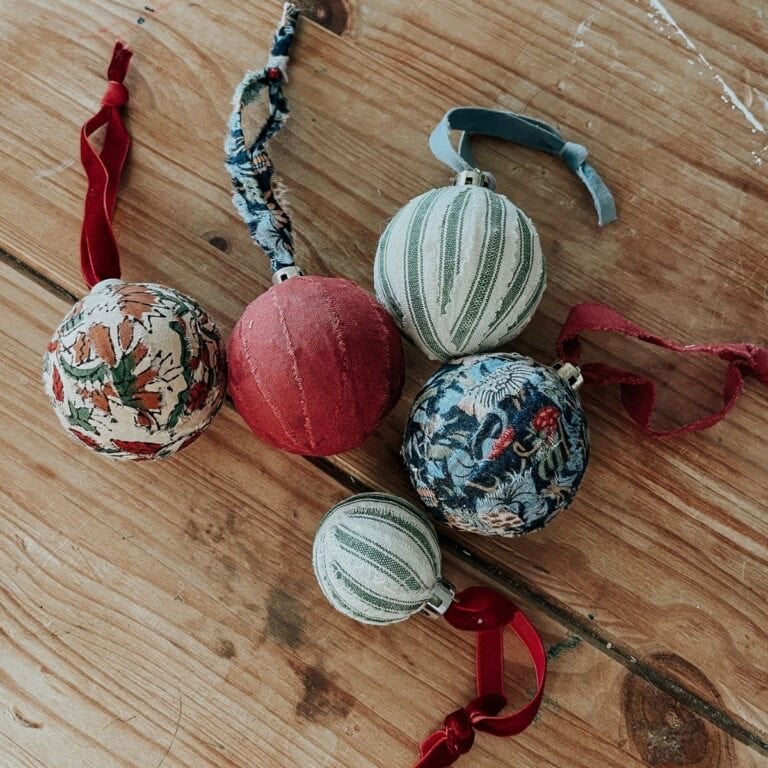
Decoupage Upcycled Christmas Ornaments
I have fond memories of laying strips of sticky paper over a balloon and the feeling of confused awe at how it had magically hardened overnight.
Decoupage is one of those simple crafts that is so good it’s beloved of children the world over.
It’s about time we brought it into 2025, so I did some slow, nostalgic decoupage (or paper-mache as I used to know it!) on my Christmas decorations using leftover napkins and tissue paper.
One of those creative upcycling ideas that ends up looking like you bought it in a shop!
Supplies
You will need:
- Old baubles
- A sheet of tissue paper or a napkin
- Mod podge (glossy works best)
- A small paintbrush
- Bamboo skewers (optional)
SHOP THE PROJECT
What to Buy for Decoupage Christmas Ornaments
Shop the products I used


Step 1: Prepare Your Materials
Note: If your old Christmas ornaments are brightly coloured you may need to go through this process first with a base layer of white or another neutral colour, before you add your decorative layer.
If you’re using a napkin, separate the layers so you just have the top coloured layer. Cut or tear your paper or napkin into small pieces.


Step 2: Apply the paper to your upcycled Christmas ornaments
Gently remove the cap on top of the ornament, if you can. If not then just work carefully around the top.
Paint on a small amount of mod-podge and then lay your pieces of paper or napkin on top. Use the paintbrush to smooth the strips down.
Continue until your bauble is completely covered. Leave to dry overnight. I find it helpful to pop the bauble onto a bamboo skewer to dry.


Step 3: Finish the Ornaments
Apply a second coat of Mod Podge all over the ornament and leave it to dry overnight again.
The next day, push the cap back on, change the string if you’d like to, and pop it on the tree!


Ceramic-Effect Upcycled Christmas Decorations
2020 was the year of painting things with ‘ceramic-effect’ paint, and while trends have moved on a bit, it’s still a fantastic way to recycle Christmas baubles.
This is so straightforward it’s basically a 5 minute craft, and adds an element of texture whilst keeping things simple.
Supplies
You will need:
- Old baubles
- Acrylic paint
- Baking soda (sodium bicarbonate)
- A paintbrush
Step 1: Prepare the paint
Mix equal parts acrylic paint and baking soda in a small dish.
Step 2: Paint the Upcycled Christmas decorations
Paint onto your baubles and leave to dry.
Add another one or two coats until the paint is opaque.

Ribbon or Trim Upcycled Christmas Decorations
I’m a ribbon hoarder, so I’m always looking for creative ways to use bits from my stash. Thankfully this idea is just perfect for the little bits of ribbon and trim that you have lying around the house.
If you don’t have lots of ribbon to hand, you can always use trim from old or thrifted pieces of clothing.
Supplies
You will need:
- A bauble
- A length of ribbon or trim (I used about 1.5m/yd of ribbon for each of my 7cm diameter baubles)
- Mod Podge
Step 1: Add the trim
Remove the cap from the top of the ornament.
Starting at the top of the bauble, place a dab of Mod Podge and stick down one end of your ribbon.
Wrap the ribbon around the bottom of the bauble, glueing as you go, until you reach the top again. Cut the ribbon if needed.


Step 2: Repeat to Cover the Ornament
Continue to wrap pieces around the bauble, crossing them over at the bottom, until your bauble is covered. If you’d prefer, you could try leaving gaps between the strips of ribbon.
Replace the cap and change the string if you’d like.
Here are a few more ideas for wrapping baubles in ribbon or trim:


Before You Pack the Decorations Away…
It’s funny — when I first opened that box of decorations and sighed at the glittery chaos inside, I couldn’t have guessed how much joy there was waiting in a pot of paint and a bit of ribbon.

If you’re feeling inspired to keep the making going, you might like these next:
How to Make Fabric Scrap Ornaments (Easy Upcycled Christmas Baubles)
Potato Stamp Wrapping Paper (3 Delightful Designs You’ll Want to Try!)
How to Make Fabric Bows (Easy Tutorial for Large & Small Bows)
How to Make DIY Reed Diffusers
Before you tuck that box of decorations back into the loft, take another look. There might be a few more treasures in there just waiting for a new life!